Zoo Photography
It might seem strange to start a class on nature photography by talking about photographing in zoos and other sites where wildlife is captive. However, zoos (I will call them all zoos) are great places to photograph because: there are plenty of subjects; they can't run away; you can photograph inside if the weather is bad; they are readily available--most medium-sized communities have some form of zoo; you can find and photograph species you would never get the chance to see in the wild; and it is a lot of fun. You can really hone your skills and get great photos at the same time.
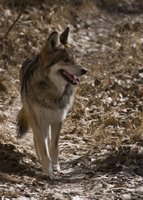
My opportunities to photograph an endangered Mexican Wolf in the wild are somewhere between none and non-existent. A zoo, in this case, the wonderful Albuquerque Zoo, provided me with an opportunity.
Zoo Passes
The first challenge with zoo photography is getting in the gate. My wife and I have purchased an annual pass to our local zoo for years. A great advantage of that is this pass gets us into a lot of other zoos around the country either for free (uncommon) or at a discounted rate. That saves a lot of money if you are prone to visit zoos as often as we do. Ask about it at your zoo--they can provide you with a list of participating zoos as well.
Gear Management
Once in the gate, you may face the challenge of how to carry everything so it is comfortable and handy. If you are like me, you have a backpack full of gear and NONE of it can stay in the car, just in case. I found quickly that having the gear on my back was both inconvenient and uncomfortable. We have discovered two solutions: the first is a folding handcart, available at retailers that sell luggage. Ours was available at Fred Meyer for about $25, but I actually bought it at a garage sale. If you can find one with pneumatic tires, that is by far better than solid tires. The pneumatics are easier on your gear, pull better and don't drive you crazy on boardwalks. The second solution, and one we often use when traveling, is to just rent a kid's wagon or stroller once you arrive at the zoo. These usually run around $5, but it is money well spent.
What Should I Photograph?
If you are new to zoo photography, you might be asking, "What do I photograph?" Caged animals don't seem all that exciting, especially if their cages or other evidence of captivity are noticeable in the image. Well, zoo photography really isn't any different than any other photography: it is all about composition, angles, framing, light, detail, and telling a story.
Zoos often have animals, particularly birds, which wander freely through the zoo. These make great subjects because with a little patience you can usually get the background you want.

This fine peacock portrait (left) could have been taken anywhere. It was actually taken in the Omaha Zoo as the peacock ranged freely, allowing me to choose a background that didn't shout, "Zoo!" I used an aperture of f8 to capture more detail in the bird and used sufficient distance between the bird and the background to let the background blur into anonymity.
Even better, free food and safety attract wild animals to zoos as well. i have photographed wild waterfowl, songbirds, squirrels, and even deer in zoos and again, with a little patience you can get a great background.
Don't forget the vegetation in the zoos. Many zoos bring in many different exotic plants and blooms can happen anytime of year in the heated buildings.
There are also times when the best photos actually include elements of the zoo life. Human reactions to animals are sometimes dramatic offering some introspective opportunities. Often, the animals themselves demonstrate personalities that are best explained by surroundings that show they are captive. Sometimes these opportunities are a bit sad, sometimes they are comical. Either way, don’t shy away from these prospects.

People interacting with or responding to animals at the zoo is often makes wonderful photographs and can really tell an interesting story.
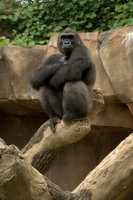
This Mountain gorilla appears to know that he is on display, yet he demonstrates pride and defiance by his posture.
And there is always detail. In fact, a great self-assignment is to spend a few hours or even a day concentrating on nothing but details. What kind of details you ask? I love feathers, eyes, rough elephant skin, snake scales, zebra stripes and other geometric patterns, macro and more.
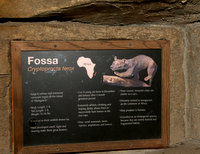
Finally, I always try to take photos of the signs describing the animals. I find that it really helps when I am editing and naming photos to know which zoo I was at, where the animal was from, and the correct spelling of the name. If you can get into the habit of photographing the sign immediately before or immediately after or in the middle of the sequence it helps in locating the right sign later. The point is to be consistent in how and when you photograph the signs. Since these are just "meta data" I usually set the camera on a low jpg setting to save card and computer storage space.
Perhaps now you can see why I get excited about zoo photography. There is so much to do and see!
Framing the Image
Let's start with angles and framing. If your goal or the story you want to tell doesn't include seeing fences and cages, then choose your angles carefully. For instance, you can isolate an giraffe's head and neck against a blue sky and no one will even know it was in a zoo. You can do the same thing closer to the ground too. Often, changing perspective just a little can remove a fence and place the animal against a more suitable background. Green foliage is especially good for background material.
Another tactic is to limit the Depth of Field (DOF--the amount of the photograph that is in focus or perceived to be in focus). You can control this two ways: by using a wide or open aperture (a smaller f-stop number. F4 will have less DOF than f8 all else being equal) or by maximizing your magnification. The longer the lens, the smaller the DOF.
Distance between the subject and the objectionable background also helps. The greater the distance or separation, the more out of focus the background will be.
Tight framing can also reduce a messy background. If you don't have enough lens, take the image anyway and tighten the framing during the editing process.
Don't Fence Me In
When people think about doing serious photography in zoos, the first thing that comes to mind is, how do you avoid the fences and cages? The truth is, sometimes you can choose the appropriate angle as described above, but often you can't avoid the fence. You photograph despite the fences and just make them disappear. No, I am not talking about witchcraft, or that modern equivalent, Photoshop. It is actually far more simple than that if you have the right equipment. What you need is a reasonably fast telephoto lens. My Nikon 200-400 f4 works great. There are three related secrets to making a fence, even a heavy thick one, disappear. First, get close to it. Real close. My lens shade keeps the front element of the lens about 6 inches from the wire and that seems to work fine. Closer still would be even better though. The second part of the equation is to use a wide aperture such as f4. This works because of the selective narrow depth-of-field (DOF) of the lens (a combination of a wide f-stop and the magnification of the telephoto). Third, put distance between the fence and the animal. The greater the distance the better the result. If you are focused on an animal's eye and that animal is ten feet behind the fence, the fence will literally disappear because it will be so out of focus. However, if there is only five feet, you might see hazing from a slightly more in-focus fence.
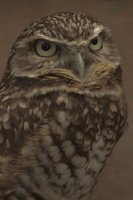
I photographed this burrowing owl at the Tracy Aviary in Salt Lake City, Utah. Although I was further from the fence than I wanted to be, about a foot, the image still came out very sharp and without distortion. The bird was about 6 feet from the heavy wire and I shot at f4 and 400mm with a Nikon D7000.
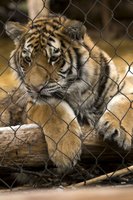
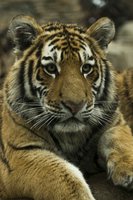
This tiger cub (left) is too close to the fence and there was nothing I could do about it. However, in the following photo, the cub moved away from the fence, allowing me to capture a wonderful portrait (right). Nikon 200-400 lens, D7000, f4 at about 400mm.
My wife is still amazed that this works, but it does. I have tried it many times. There are certainly times when it won't work though. If the cage wire and the animal are too close together, then the depth of field will pick up the fence. How much will depend on how close together they are and the f-stop that you use. The higher the number, the greater the DOF, resulting in more of the image in-focus. The cage fence can end up being anything from a slight haze on the image to something pretty significant. In those cases, a lens with a wider f-stop (f2.8 for instance) may help.
One great thing about this technique is that it works outside of zoos as well. I have photographed many a ball game through a chain link fence using this same technique.
Shooting Through Glass
Photographing through glass at a zoo or an aquarium is not as clear as it might seem. There are two problems: reflections and distortion. Both are corrected by getting your front element up close to the glass, just like with a fence. A rubber lens shade is pretty important to help shield the lens from reflections and to protect the glass of the enclosure from scratches. You won't endear yourself to the keepers of the zoo if you damage their expensive enclosures.
Animals behind glass are either: dangerous or require a controlled environment. Either way, most glass enclosures at zoos are indoors and often lit with fluorescent or mixed lighting. Even then, they are dark and dreary, photographically speaking. You can overcome those obstacles using a flash. Flash will also put a highlight in the eye (often a second one) and can stop motion, making handholding a camera a reasonable task.
Like with the lens, it is important to get the flash as close to the glass as possible. Flash bounce off the glass can dramatically reduce automatic exposure and often times shows up in the photograph in strange ways. Having the flash off-camera and pointed at an angle to the glass really reduces the “flash flare” that can fool auto-settings. I prefer to use a bracket and a flash cord. With a bracket, I can angle the flash and still manage the camera alone. A flash mounted to a cord and handheld offers some advantages as well. You can actually control the direction of the light in many cases and add character to the photo and control shadows (at least to a degree). It does require two hands or the help of an assistant though.
I find that a lens with a wide zoom range is often my lens of choice for the close quarters of glass enclosures. I often use my Nikon 18-200. With that said, it is important to clean smudges off the glass. Wide angle settings are not nearly as tolerant of foreground obstacles as a long telephoto is. I carry a micro fiber cloth and a small bottle of cleaning solution just for that purpose.
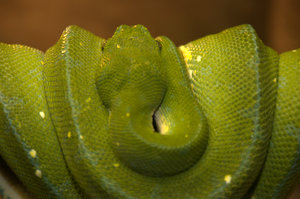
This green tree python was photographed at Utah's Hogle Zoo. The glass was thick and the lighting was poor, but the combination of flash and a camera pressed tight against the glass resulted in a fine portrait. Even though the snake didn't move, I was able to photograph it from several angles.
Aquariums
Photographing in an aquarium isn't much different than in a zoo. The challenge of glass is a constant though, but is generally overcome using the same techniques. Here though, the challenge of shadow control becomes even more important. A shadow cast on a background or on another fish is very distracting. This is where being able to control the flash direction becomes very important. If you can position the flash above the subject and pointing down, the shadow will often fall outside the image. An advantage to this is that natural light comes from above, not straight in, so the photo looks more natural.
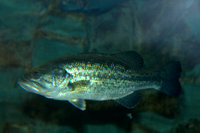
This photograph of a largemouth bass in a Cabela's aquarium shows the difficulty of using on camera flash. The shadow did not fall out of the image and the flare (upper right corner) is evident.
A strange phenomenon when photographing in aquariums is that the subjects are often far closer than you would normally find animals, even in zoos. They may be only inches from the glass. It is important to have a lens that can focus closely, and has wide angle capability. For equipment, I find that a lens that will handle a wide range, like my Nikon 18-200, is helpful and occasionally use a Nikon 12-24 mm. Even though it will focus down to several inches, I rarely use my macro lens because most of the time, the subjects are moving and I cannot react fast enough with the magnification and narrow DOF. The wider angle lenses give me a bit more “breathing room.” I can always crop in post processing.
While the glass and the water rapidly attenuate the light from the flash, if the subjects are within a few feet of the glass, I can usually use a smaller f-stop and take advantage of the greater DOF. This is a great advantage in producing sharp images.
Finally, there are times when the detritus, all that floating stuff in the water, can really interfere with an image. Light from the flash or other sources can reflect off of any particles, creating haze or unwanted spots. The only real solution seems to be to only work with tanks that are free of flotsam.
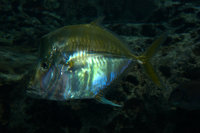
This lookdown fish in the Atlanta Aquarium is a good example of what you can do in an aquarium.
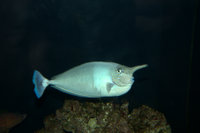
Another example, this time from the Albuquerque Aquarium, that shows what proper technique can yield.
Consideration for Others
One thing about zoos, aquariums, aviaries, and such: they are public places and you will not be alone. Don’t let your photographic zeal put you at odds with others who are also there to enjoy the unique surroundings and the wildlife. When I am photographing a snake behind glass, I am often the only person who can see that snake. I have to make an image or two and then back away and let others enjoy it too.
There are several ways to solve the issue with people and crowding. The first is simple. Have a plan and be the first in the gate when the zoo opens. If you know exactly where you want to be, you can often have half an hour or more before the masses begin to arrive.
The second way is to befriend a zookeeper and gain access to areas or times when the general public is not around. You might be amazed at the cooperation you can receive if you demonstrate some of your work and promise the zoo some images for their files or walls.
Finally, even though I usually have a small tripod with me, I rarely use it anymore. Between vibration reduction, the ability to change ISO with a digital camera, and flash, I find that I rarely need it. In days gone by, the tripod was a big inconvenience for other visitors. While I find that most people go out of their way to not disturb me when photographing, I don’t want to disturb them either.
Marketing
If you have a desire to sell wildlife photography, you might be inclined to think that there is no market for zoo photography. You couldn’t be more wrong. The October 2011 issue of Outdoor Photographer magazine highlighted a photograph taken by professional Franz Lanting. It was taken at an aquarium. If it is good enough for Franz Lanting to do it, zoo photography is good enough for me too.
Some people will have you believe that selling photographs of captive wildlife is morally wrong. For me, so long as I make it clear that the photograph is of a captive animal, I don’t have any moral issue with selling it. In fact, there are a number of good moral reasons to promote captive wildlife photography over wild photography. Not the least of these is the fact that these animals are far more used to humans than their wild counterparts. Photographing them is not likely to interrupt essential breeding activity, subject them to predation, or other ecological threats.
There are a number of outlets for marketing zoo photography. The relatively recent upsurge in “penny stock photos” through websites such as iStock, are a readymade market. The buyers here are usually not the larger magazines. Rather, they are newsletters, corporate publications, and similar venues. They don’t care if the animal is wild or captive. In addition, cute photographs, even if they are clearly made in zoos, are desirable in these markets.
Greeting cards and calendars are other potential markets for zoo photographs. Tight portraits and cute baby animals seem to always be in demand.
So, get to your local zoo, visit zoos when you travel and have fun! You will find great opportunities to hone your skills and you might just walk away with the image of a lifetime.