Taming Harsh Light and Shade with Reflectors and Diffusers
Light is the foundation of all photography yet all light is not created equal. That is why you hear photographers reverently refer to “sweet light”, “perfect light” and “storm light”. Unfortunately, most of the time, light is less than perfect and when the light isn’t “sweet”, you sometimes just can’t make a decent image despite all the wizardry of Photoshop.
Full sun days are particularly problematic. When the sun is high in the sky, shadows are deep and dark as caves. What isn’t in shadow is so blasted by the strong light that highlights often “blow out” light areas of the image leaving hotspots without detail. The remaining parts of the scene are illuminated by light coming almost straight down, flattening details and creating dappled unflattering light on the landscape.
The deep shadows do offer the photographer a place to get away from the harsh light. However, shadows lack directional light. Colors in shaded areas are limp and lifeless and the entire image sags like the face of a basset hound.
Yes, on a sunny day, photography becomes challenging from a couple hours after sunrise to just a hour or two before sunset. For large landscape photos there may not be much you can do to tame the light. Be prepared to scout locations, take naps or find something else to do. But for smaller subjects, such as flowers or insects, you don’t have to give up photography during the middle of the day if you have a couple of simple tools.
There are three tools that help tame the light—flash, reflectors and diffusers. Read the lesson on using flash outdoors here. As for reflectors and diffusers, read on.
A reflector is anything that reflects light back onto a subject. It can be a commercial reflector, a sheet of white cardboard, a sheet of paper, a crinkled sheet of aluminum or even a big white rock that is in just the right place. The type of reflector matters less than what it can do, which is to even out light or bring soft directional light into shady spots.
There are a number of commercial reflectors available in various sizes. I have reflectors up to six feet tall as well as ones measuring twelve inches across. Possibly the most useful is a 24 inch reflector disk that has an interchangeable cover with four different diffusers: silver, white, gold and gold/white. Without the cover, the disk is a diffuser which I will cover below. All the commercial reflectors collapse to a fraction of their size, making them easy to carry in the field.
Homemade reflectors that I use include a large sheet of foamcore, gold colored cardstock and crinkled aluminum foil glued to cardstock. They all work as equally well as the commercial models, they are just less portable in the field at times.

This homemade reflector is just a piece of card stock. These are simple to make in any custom shape and are inexpensive.
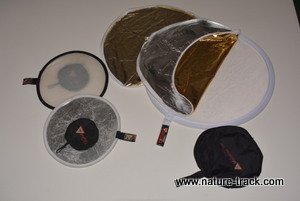
Commercially available reflectors come in a variety of sizes, shapes and colors. They often fold into a very compact package making them ideal for field work.
Using a reflector is quite easy. All you need to do is catch the sun and reflect that beautiful soft light back into the subject. Sometimes it takes a little work to find the proper angle to get the reflection that you want, but it is usually doable. Also, the effect of the reflector is easy to see through the viewfinder or on your screen. You can adjust the strength of the effect by changing the distance and angle in many cases.
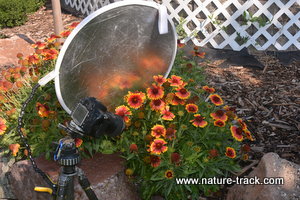
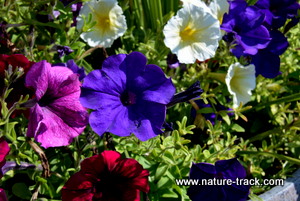
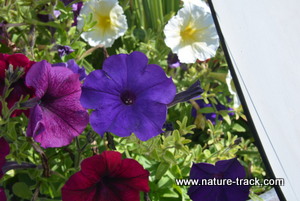
This is a common set up. The sun is at camera right and bouncing off the reflector onto the flowers. You can readily see the efffect the reflector has by comparing the flowers near the reflector to those on the right--the reflector has an effect on about half the flowers. As this image demonstrates, I often use a clamp with an articulating arm to help me hold the reflector in place.
In the photo above, you can see that there are several different standard reflecting surface colors, and these serve different purposes. I will go through each one.
White—white reflects the softest light. It is useful when the reflected light source is strong or when you just want a kiss of extra light. White also doesn't change the color temperature of the light coming in.
Silver—silver reflects light very strongly. It is useful when the reflected light source isn't very strong. If the light source is bright, silver can often create a very stark look. It can easily overpower other light sources and flatten the image much like an on-camera flash can. Incidentally, mirrors are super reflective silver reflectors. They are so strong that I rarely find a use for them but I have used them to light up very dark spaces such as burrows.
Gold—strength-wise, gold is closer to silver than to white. It can reflect light rather strongly. The real purpose of gold is to change the temperature of the light, creating a warmer, more “sunset” feeling. If you are photographing a yellow flower in shade, this might be useful to enhance the yellow, but it is something to be careful with because it will cast a definite color.

Gold-white/gold-silver—gold-white and gold-silver were developed to soften the effect of the full gold and give a more natural “glow”. They can be a better choice than gold in those situations where you want to warm up the subject of your image without drawing too much attention to it. The choice between gold-white or gold-silver follows the same logic for silver and white above.
For most of the things I tend to photograph with reflectors, I gravitate to the white or silver. I am always cautious about using the gold because of the color changes.
And that brings up a final point. Some would argue that anything you can do with a reflector you can do with Photoshop. Not being a Photoshop expert, I don’t know if that is really true or not. What I do know is that I don’t want to spend any more time at the computer fixing things that I should have or could have done correctly in the field. In addition, by using a reflector, a dull subject often comes to life. That keeps me shooting in situations where I might otherwise just give up.
One last thing about reflectors: they aren't just for bringing light into a shady spot. Indeed, one of the best uses of a reflector is in a sunny situation where you just want to cast light into the shadowed side of a subject to lighten the shadow and better balance the image. For instance, in window light photography of people, a standard trick is to have the subject pretend to be reading a newspaper or book. The real purpose of the paper or book is to reflect the light from the window back onto their face.
In the photos below, you can compare the effects of the different reflectors.

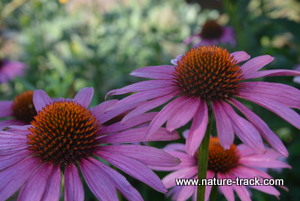
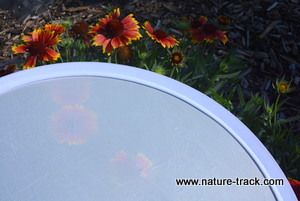
In the upper photo, no reflector was used. I could have increased the exposure but that would have overexposed the background. I balanced the light by adding a silver reflector to brighten the flowers and not change the background.
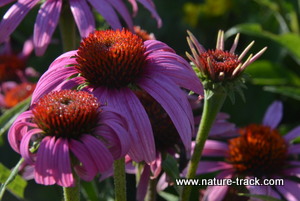
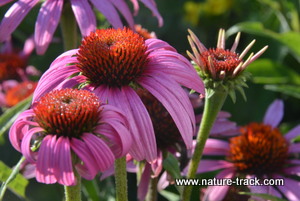
In the upper photo, the coneflowers are in the harsh light of late morning. In the bottom image, I used a white reflector to fill-inn the darkened shadow areas and create a better balance. There is still direction to the light but the contrast is tamed to a reasonable level.

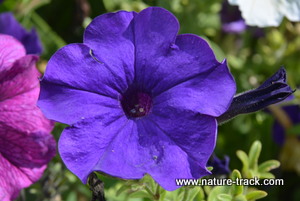
The same is true with these petunias. The flowers are in full sun and the reflector was used to balance the contrast into something that still has the modeling effect of directional light but that isn't as pronounced.
Diffusers
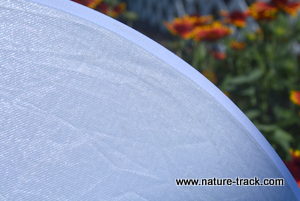
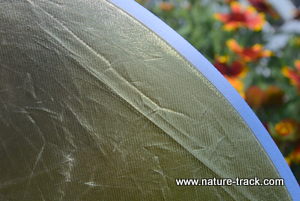
A diffuser is a semi-transparent material that lets light through but tames that light into a beautiful directional soft light. You can see the transparency of the diffuser in the photo above. I placed the cover for the reflector underneath the diffuser and while you can’t read the writing on the case, you can certainly tell that it is there.
This commercially available diffuser is made from a white nylon that will allow some light to pass. It can also serve as a weak white reflector.
You use a diffuser exactly the opposite of a reflector. With the reflector, you are bouncing light back into the subject. You place the diffuser between the subject and the light source (presumably the sun). The light that filters through, is, well, diffused. There is only one secret to using a diffuser. The closer you get to the subject, the better the light becomes. If the diffuser is too far away, it simply creates shade and not diffused light.
In the photos below, you can see the difference between a photograph taken in the direct sunlight and one taken with the diffuser. You can also see how close the diffuser is to the subject in order to produce the desired effect.
In these images you can see the effect of a diffuser. In the upper photo, the dappled shadowing really detracts from the image. With the addition of a diffuser between the subject and the sunshine, the light and contrast even out. I intentionally included the diffuser in the second photograph so you could see how close it is. At just a few inches, it is almost too far from the subject to get the full benefit of diffused light vs. shade.
There is one other way to tame harsh light or high contrast. It is called High Dynamic Range, or HDR for short. I will cover that in a future lesson.