Change Your Perspective for Better Nature Photography
If there is one thing that will advance your photography like a catapult, it is learning to photograph your subject from different perspectives. That includes up, down, from the side, backlit, close, far, and with different lenses and settings. All these can dramatically change the way the subject is portrayed. In essence, it is all photography lessons rolled into one big enchilada. That is probably going to be more than we can bite off here so I will likely only cover a subset of these.
When I first thought about this subject, I was considering nuances of perspective: what tiny changes could you make that would dramatically improve a photograph. The photographs below, from the outlet of Leigh Lake in Grand Teton National Park illustrate this concept. I waded into the water beneath a foot bridge to grab one more image before jumping back into the canoe for a paddle back down String Lake. I thought it would just be a grab shot anyway, something to remind me of the place. I knelt down, intending to get a dramatic foreground using the boulder to anchor it. Nice image, but I could immediately tell that something was off. I couldn’t decide what it was, though.

Then I stood up and the image suddenly jumped out at me (second photo). From the kneeling position, the boulder had been too prominent—an anchor yes, but one that was sinking the image not lifting it up. I had changed my perspective just a little bit, but it made a world of difference in the feeling of the photograph.

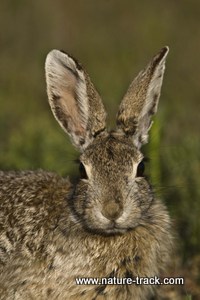
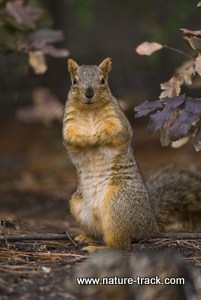
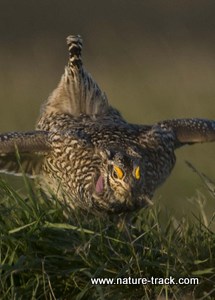
Another classic example of what a change of perspective can do is found in wildlife photography. In the photograph of the rabbit on the left, I was shooting downward, grabbing a shot before the bunny scampered off. When it proved to be much more tolerant of me than I deserved, I slowly got down on my belly, almost at eye-level with the rabbit. The change in perspective made a tremendous difference in the intimacy of the photo. The first photo was a snapshot, the second, a portrait. You can also see from the photograph of the fox squirrel and the sharp-tailed grouse that getting on eye-level, even if it means getting a little dirty, is worth the effort.

It isn’t always easy or even possible to get on an animal’s eye level. Many times you will be shooting at a downward angle, occasionally on an upward angle. You can sometimes approximate getting on an animal’s level by using distance as an ally. As you back up, the angle of the image flattens more and more and this will create the feel of being on the animal’s level. This only works to a certain degree but it is worth trying when you can’t get down on eye level for whatever reason.
As I was hiking in Grand Teton National Park one afternoon, I heard a growl in the tree above me. I looked up to see this black bear peering back at me.

I had apparently wakened it from a nap. A better angle and prudence both dictated that I back off a bit. As I moved further away, the angle began to decrease and the bear and I appeared to be closer to the same level. A teleconverter on my Nikon 200-400 helped to tame the distance.

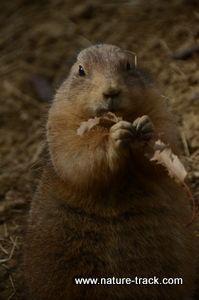
I used the same technique to photograph this prairiedog in the Knoxville, Tennessee Zoo. I couldn't get into the cage with it so I moved down the cage until the angle became tolerable then I just zoomed in. It isn't perfect, but it is better than it started out to be.

The rules of perspective that hold true for people photography work in nature portraiture as well. With people, a downward angle tends to portray them as weak and vulnerable; great if that is the look you want but really looks silly if you are trying to convey confidence. For most portraiture, the camera is placed at about chest height to render an even confident feeling—not weak, but not domineering and in-charge like a photo taken from, say, knee height or even floor height. Three very different perspectives—none is right or wrong, just different—but the photographer needs to know what feeling he or she is trying to portray. If you aren’t sure, try all three angles. Sometimes you get a pleasant surprise.
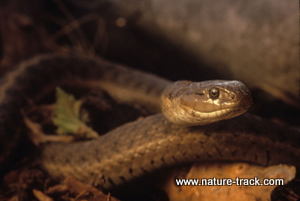
In this intimate portrait of a garter snake, I wanted to portray a less menacing look. I chose an angle slightly above the snake’s head rather than eye level. Had this been a rattlesnake and I wanted to portray the “don’t tread on me” aspect, choosing a viewpoint below eye level would have been appropriate.
On the other hand, for this image of a majestic bull elk, I wanted to convey power. I set the tripod on its lowest setting which put the camera just about knee level and portrayed him as king of his world.

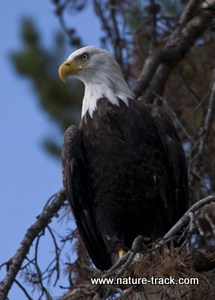
For this bald eagle, I didn’t have a choice other than to photograph upward and at a fairly steep angle. However, with this particular subject, projecting power and regalness was the right feeling anyway, so I didn’t mind. I would have still liked to have captured a few images at eye level, but this one still works for me.
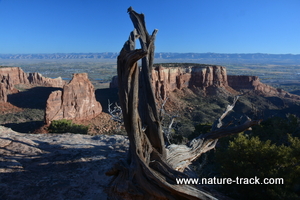
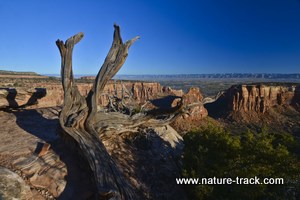
The nuances of perspective can really make a difference. The top photograph below, taken at Colorado National Monument outside of Fruita, Colorado was the first one I made. I was excited by the scene and by the log and grabbed the first image I saw. When I looked at the LCD screen though, I could see that in my enthusiasm, I had forgotten about perspective. The juniper skeleton skewered the image dead center in the frame. I changed my perspective a little and used the juniper as a frame. This resulting image was much more pleasing. I probably only moved a step or two but that little change made a big difference.
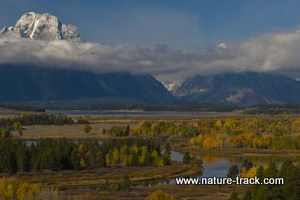
Changing perspective also means photographing the same scene in a different way. For instance, Oxbow Bend in Grand Teton National Park is an iconic location for landscape photographers. There is one exact spot that is considered, “The Spot” and the competition for that spot during the sweet light hours is intense. I decided to get a different angle and climbed about 100 yards up the hill across the road for this photograph. It proved to me that “The Spot” is more legend than fact. There are always different and equally interesting viewpoints. I have also photographed this same scene from near “The Spot” as well as from the river bank and even from a canoe. All are terrific. It is just a great place to be and the possibilities are endless.
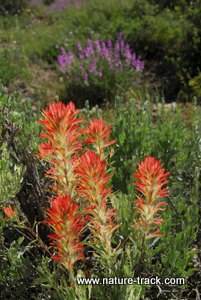
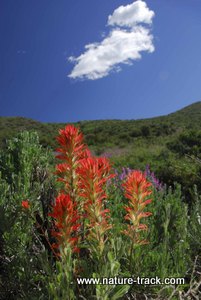
Deciding what your subject is also determines the perspective to use. In the following photographs of the Indian paintbrush plant, the flowers are the subject of the photo on the left and the landscape is the subject of the photo on the right. I would use the first to illustrate the beauty of the flower, the contrasting colors or for identification purposes. The second photo is about the beauty of the place in which the wildflowers play a role. Neither is wrong, and both were taken on the same outing along with many more.
Whenever you find a subject, take the time to think through what you hope to portray. Look at the subject from different perspectives. Sometimes even tiny differences can have a major impact on the image. Perspective. That’s what it’s all about.