Foreground, Middle Ground, Background (FMB)
I once attended a seminar by a famous portrait photographer. He was talking about family groupings and how to make them interesting in a natural setting. Among all the technical advice, he kept repeating one mantra: foreground, middle-ground, background. He demonstrated how he would look for locations where he could have something in the foreground—a potted plant, steps or something else before the middle ground, which was his subject family. Then he wanted a fairly clean background that would not distract from the subject. In this way, he achieved a three dimensional look that was very pleasing. He intentionally selected apertures that would keep the subject family in focus but blur both the foreground and the background.

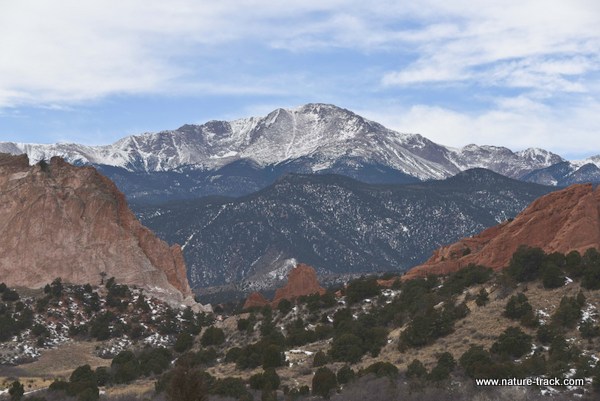
I like both of these images of Pike's Peak in Colorado, but the bottom one, shot through the rock formations at Garden of the Gods, has much more depth and interest.
When I did ball team photos, I would always try for a simple background that would complement the team and not distract. That wasn’t always possible, but I tried. Foregrounds, though, just didn’t fit into team photography very well.
With nature photography, the foreground, middle-ground, background mantra is very important, especially with scenic but also with wildlife when doing an environmental portrait where the environment is as important as the animal.
Foreground imaging as pioneered by David Muench actually puts the foreground as, if not the subject at least integral with the subject. In these photographs, the foreground dominates the photograph. These images can be really appealing though because they do include the middle and background. Still, the foreground is what catches the eye.
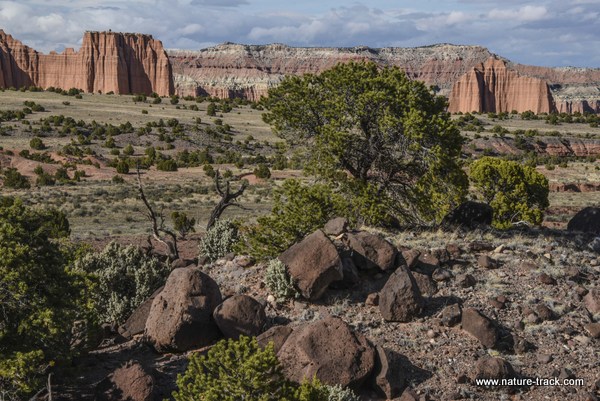
This might be something that David Muench might do (although he would likely do it much better!). The foreground rock is very prominent. It is almost like two different images. I really like doing this and find that a wide-angle lens of less than 20mm full frame equivalent is necessary. However, this isn't the only way to use FMB.
You
can still use fore-middle-back ground even if the foreground isn’t dominant. In
fact, most scenics really benefit from it. However, unlike the professional
portrait photographer, a scenic photographer generally tries for maximum depth
of field so that the image is sharp from front to back. That sometimes takes a
bit of thinking and planning.
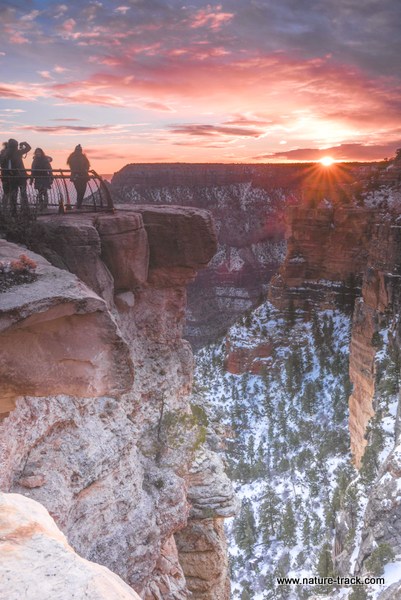
In this view of the Grand Canyon from Mayer Point on the south rim, the depth is achieved by creating foreground, middle ground and background. Remove the foreground in this photo and it is much less powerful even though the sunrise is still beautiful.
First, realize that the more powerful the lens the less depth of field you will have. Sometimes this is not resolvable and you must decide what will and what will not be in focus. If that is what the situation calls for, then that is what you do. However, if you can achieve the same result you were looking for with a wider angle lens, you will gain dramatically in apparent sharpness. I recently acquired a 17-24mm wide angle for my full-frame Nikon D810 and it has opened up a lot of possibilities even over my 28-300 zoom. A rectilinear (not a fisheye) 12mm lens would be even better in some instances.
The first step in getting sharp images front to back is to use a low ISO (100-200) and a small aperture, say f16 or f22. These aren’t where the lens is at its sharpest (usually around f11) but you need the depth of field.
The second thing you can do to improve front to back image sharpness is to tip the camera downward slightly. This puts the plane of the shutter more in line with the image. This is exactly what you would be doing if you had a tilt/shift lens. That is really the best option but they are a bit spendy (around $1500 last time I dreamed of one).
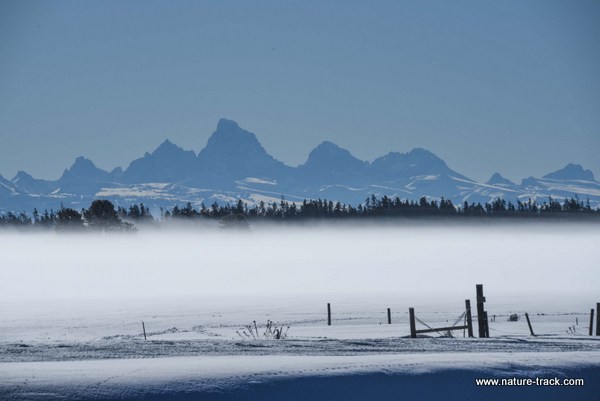
You don't always need to use a wide angle lens to capture a FMB image. I used a telephoto (390mm) here with an aperture of f16. This is taken from Harriman State Park in Island Park, looking east toward the Tetons.
I said that the first step is the aperture. That is because it goes without saying that you need a rock solid base for your camera such as a sturdy tripod or a beanbag. You will need to be solid because the small apertures will usually require a slow shutter speed.
There is another way to get perfectly focused images from front to back. That is to use focus stacking. I am speaking theoretically here as I haven’t tried this yet. However, the concept is to take the exact same photo numerous times, changing the focus point each time. Depending on your subject, this may take six or more images. It is critical that there is no movement of the subject between images so this won’t work if there is any wind moving things within your frame. Anyway, once you have your six plus images, you go to Photoshop or a program like Helicon Focus, and stack the images like you would an HDR exposure image. The program selects the sharpest part from each image and combines them all into one new image. George Lepp has demonstrated the results of this and it is impressive. As soon as I figure out how to do it I will let you know.
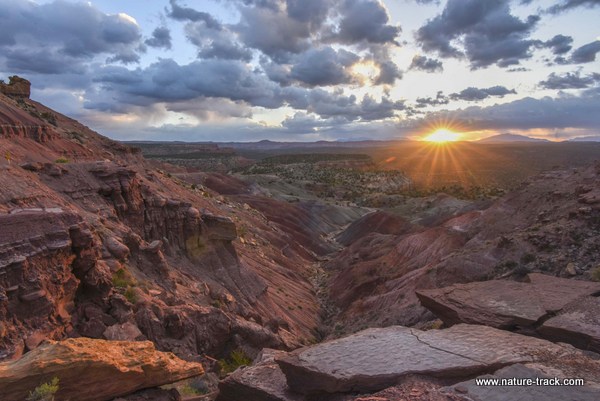
It almost feels like you can step right into this image made on the Burr Trail in southern Utah. That is what FMB is all about. This required a combination of a wide angle lens and a small aperture of f20. (That is also how I made the starburst out of the sun).
So, that is the technical side. The rest is really creative choices and decisions. What is the subject? Is it the prominent foreground object? Is it a rock formation in the middle? Is it the rising sun? To be perfectly honest, sometimes I have trouble defining what the subject in my photograph is. A sunrise is certainly about the rising sun, but without a strong scenic middle and fore ground, it is just another colored ball in the sky. So for me, sometimes the subject is more literally the image itself, and that makes having all the elements, fore, middle and background very important.
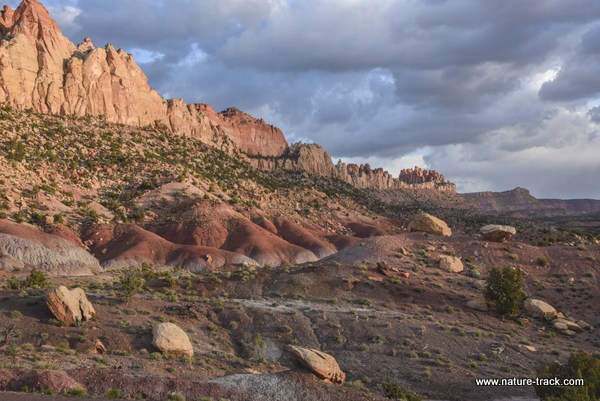
This is a photo from the Burr Trail in southern Utah. By backing up a bit and getting the rocks in the foreground, I added depth to this image. However, the foreground is not overpowering, it just provides a stepping stone into the image.
I
really like the Muench style of having a prominent foreground object. I think
the secret to this technique is to not let the foreground overwhelm the rest of
the image. That means keeping the relationship between the two somewhat
realistic. With a superwide lens, it is really easy to let the foreground
object dominate while the middle and background recede into obscurity.
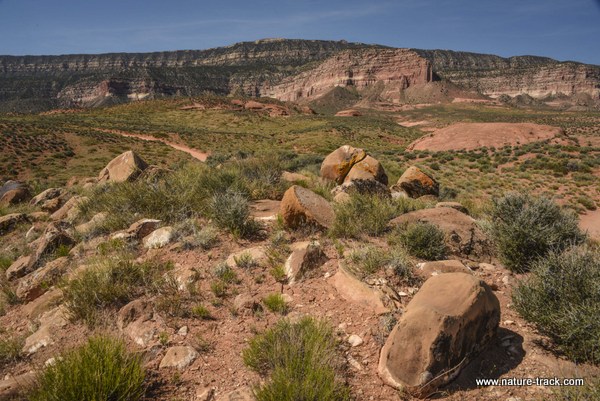
In this view of the Hole-in-the-Rock road in southern Utah, the rocks in front definitely lend to the feeling of 3 dimensions in the photo without overpowering it.
This is usually caused by placing your camera and lens too close to the foreground object. Again, this might be exactly what you are trying to achieve and that is fine. However, if you are looking for a balanced scenic with fore, middle and background, you may need to move back a little. With a wide angle lens foreground objects will look larger and the background will recede automatically and you don’t want to exacerbate this.
Foregrounds don’t need to be all powerful though. They just need to help create depth in the frame. So a simple foreground that accomplishes that is all that is needed. In the example below, the floating log in Island Lake in the Boulder/White Cloud wilderness doesn’t overpower the scene at all but does add the necessary depth and interest to make this a compelling photograph.
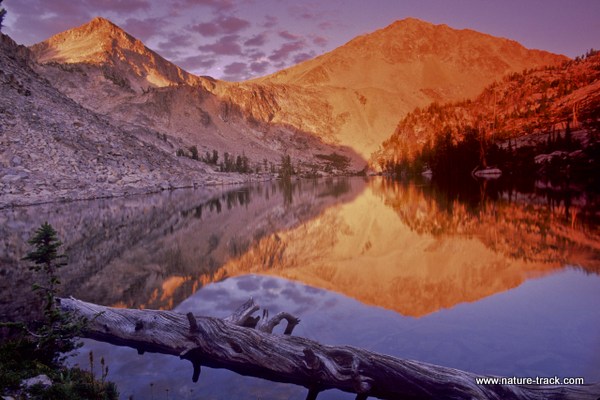
This photograph of Island Lake is one of my all time favorites. The log in front is a perfect anchor for the foreground part, the reflection is the middle ground and the sunlit mountains are the background. In this image the foreground does not dominate at all, it just complements the image.
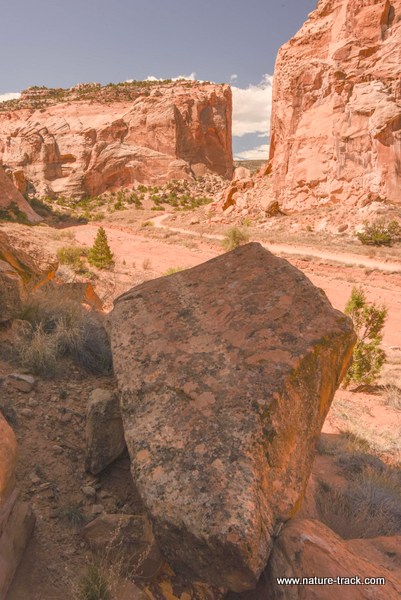
Much of the magic in a photograph with foreground comes from the actual foreground object. For me, the best objects are: unmovable (won’t vibrate in the wind), simple, and can be completely incorporated in the frame. It is also important to check the edges of the frame and see what is getting cut off. If I can avoid just including a part of something, I will do it. I prefer the all or nothing approach. Also, it is important not to let the foreground dominate the photo like in the image below. Of course, I can also think of about a million exceptions to that so, as Captain Barbosa said about the Pirate’s Creed, these are really more like guidelines than rules.
Here the foreground is distracting in my view. It was intended to be a leading line into the image but because of the lack of detail all it does is appear as a big blob. Too much foreground in this instance, but good middle ground and background.
The same thing applies to wildlife. When you want to create an environmental portrait, one that includes the animal and how it relates to its habitat, be sure to follow the FMB rule. Typically, the foreground may just be open space but any time you can add a foreground element, the image will likely improve. The element should not distract from the critter though, if the critter is your subject.

This tight composition of a turtle still incorporates FMB even though foreground and background are out of focus.
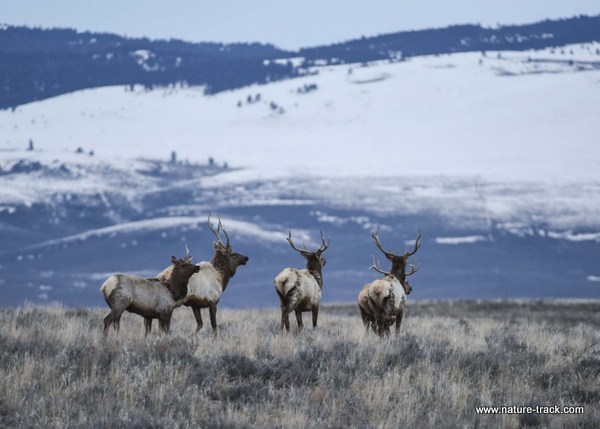
This is a good environmental photo of elk on winter range. It would benefit from a better/more interesting foreground, but sometimes you have to take what you can get!
Whenever you are composing a scenic, remember that giving the illusion of a three dimensional image is a worthy goal. This is best accomplished using foreground, middle ground and background. If your foreground creates a leading diagonal line into the image, all the better.