Using Flash Outdoors

I don’t own a “professional” camera. They are wonderful with many great advantages, but besides the outrageous expense, there is one feature prosumer and consumer level cameras have that the “professional” models don’t have and that is a deal-breaker for me. That feature is a built-in flash. I use flash all the time in my nature photography and having one conveniently built into the camera is an awesome advantage.
What? Flash outdoors? Absolutely! Anytime there is uneven or poor light, flash is useful and uneven, contrasty and poor light seem to define the out-of-doors so what could be more natural than using flash there?
Fill Flash
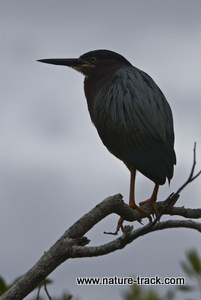
Outdoors, contrast is a common occurrence. Either the background is extra bright compared to the subject (for instance, the subject may be in the shade) or the subject is actually backlit where strong light behind the subject may be causing a nice rim light but also creating contrast. Contrast isn’t bad in a photograph, in fact it can create a lot of depth. However, when the contrast difference between the subject and the background exceeds more than two stops, you will have to choose between a properly exposed background or a properly exposed subject, but you won’t be able to have both without resorting to one of four tricks: use a reflector to bounce light into the subject, take the same image two or three times at different exposures and merge them later (called high dynamic range, or HDR), hope your software program can add fill light appropriately, or, use a flash. I am a believer in getting the shot right in the first place rather than spending time trying to fix it in Photoshop, so I usually opt for flash when the subject isn’t a broad scenic (ash berries above).
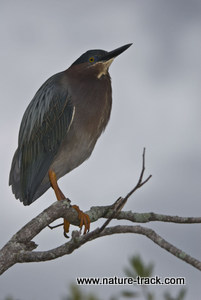
In the images of the green heron in Everglades National Park, the first photo was taken without flash. It is pretty good, but sort of lacks a little pizzazz. In the second photo, flash was used and the image came to life.
Using flash, either built-in or accessory, as a fill light is almost mandatory when photographing people outdoors. Unless you position your subject with the sun blasting them in the face, you may end up with a black blob where the face is supposed to be, or almost as bad, “raccoon eyes” when the sun is high enough to cast shadows only in the eye sockets. Both of these problems are easily solved with fill flash.
The big secret to fill flash is to not draw attention to it. For the most part, I don’t want viewers to look at the image and say, “Yup, he used fill flash.” The garish look that flash can give can be tamed by dialing down the power. Most accessory and built-in flashes offer the photographer control on how much light is flashed onto the subject. If you set your flash to TTL and select -1EV, the resulting image will have one stop less flash-produced light on the subject than “normal” from the exposure the camera would normally make, less light will be produced and the image will not shout, “fill flash!” Now, -1EV is just a starting place and you will have to decide what looks good to you, but somewhere between -1 and -2EV seems to be about right in most instances. Generally, dark subjects require less fill light, bright subjects more. I dialed in about -1EV for the heron photograph.
A second way to tame flash is to bounce the light off of something else. Newspaper photographers often adjust their flash head to point directly up and then tape a white card behind it. Light leaving the flash goes mainly upward into space, but some of it is reflected forward by the card, creating a softer light. My accessory flash has a built-in white card as well as a diffuser and I use both to soften the light when the subject is close enough.
Stopping Motion
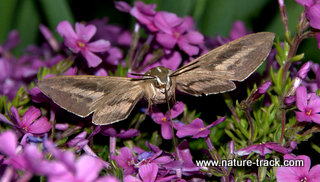
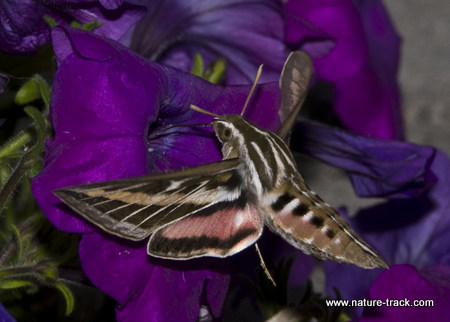
There are also other good reasons to use flash. If your subject is moving, flash may be useful to arrest that motion or your own motion. In this photograph of a sphinx moth, I handheld the camera at dusk and used an accessory flash to compensate for my unsteadiness and the rapid beating of the moth’s wings and to allow me to use a reasonable shutter speed so there wouldn’t be any ghosting. It worked rather well, I think. I have used it for moving other insects, flowers and birds as well.
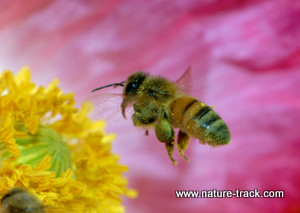
This even works during the daylight hours. I enjoy photographing bees in my garden and find that the only way to get a decent photo is with flash. The bees are challenging targets because they seem to be constantly moving. The flash can stop the motion and add a glint to the wings. A successful shot like this one below takes many tries even with flash, but would be impossible without it.
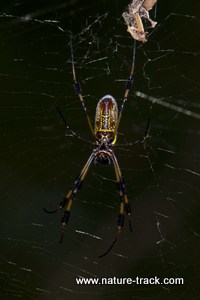
One thing to watch out for when using flash to stop motion is the ghosting that can happen if your shutter speed is too low. Ghosting is motion that occurs before or after the flash burst that gets recorded on the image. It can be tricky to balance the ambient light with the flash and keep the shutter speed at a reasonable level at the same time. With digital cameras, this can be accomplished by using a higher ISO when a higher shutter speed is needed. Even then, during low light or when using small apertures, the background may go dark or even black (spider below). If that is the case, using a second or even third slaved flash to light the background will solve the blackness issue.
Eye Shine
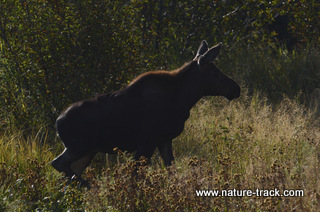
In a photograph of an animal, life is in the eyes. If the eyes are dull, or like with a black bear or a moose, seemingly non-existent in poor light, the image just won’t sing. Here again, a flash can come to the rescue. Use just enough flash to create a highlight and your wildlife image will take on a new dimension.
The image of the moose below is "missing" the eye as it blends into the dark body. In the photo of the bear, I used just enough flash to open the shadows and cast that all important gleam into the eye.
There is one caveat: TWO highlights in an eye is a dead giveaway that flash was used. If it happens, you may have to remove one with software.

Detail and Color
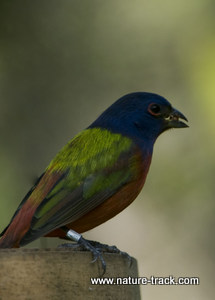
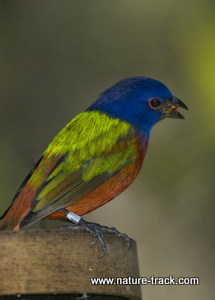
In subdued light flash can bring out detail and color light nothing else can. Sometimes reflectors can do the job if the subject isn’t mobile, but we’ll cover reflectors at another time. It is easy to see the change in these two images of a painted bunting.
There are some powerful accessory flashes on the market. My Nikon SB800 is a good example. It is powerful and has a built in zoom to match the lens being used. However, built-in flashes are not nearly so powerful. Don’t expect them to do much more than put the highlight in the eye at 25 feet.
You can extend the effective distance of the flash by using the largest aperture possible or by using a flash extender. A flash extender uses a Fresnel lens to focus the light from the flash, essentially concentrating it into a much more powerful beam. This is clearly not a tool to use for wide angle photography but it lets you really reach out for telephoto use. There is now a flash extender available for most built-in flashes. I bought mine at: http://www.rogueflash.com/.
You can also get flash extenders for accessory flashes that do the same thing. Search for Better Beamer Flash Extender on the Web. A lot of stores carry them.
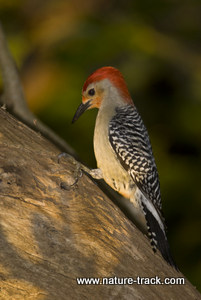
Dappled light
Another occasion when I use fill flash is when there is dappled light such as in a woodland where leaves block out the sun in uneven patterns. In the first photo of the red-bellied woodpecker below, uneven shadowing makes this a very difficult exposure and a less than satisfying image. There is no way to make this right in-camera without a flash, but the flash changes a ho-hum image into a seller (image on the right).

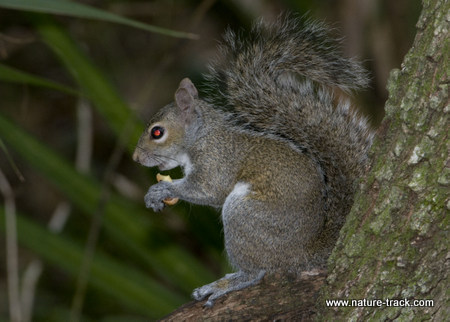
Red Eye
While flash is a great tool, there are certainly some technical challenges to be aware of. Red eye—that glaring ruby that dominates an eye when a dilated pupil allows the flash to reflect back off the retina— is caused when the flash is too directly aligned with the lens. You can resolve red eye in one of two ways. The best way is to get the flash and the camera into different axes. Use a bracket to hold an accessory flash above the camera or handhold the flash above the camera. In either instance, you will need an accessory cord to connect camera to flash.
The other way to reduce (not always eliminate) red eye is to use the red eye setting on your camera. If you only have your built-in flash, this may be your only option. Red eye reduction works by firing a pre-flash or series of flashes before the final flash fires for the image. The intent is that the advance flashes will cause a dilated pupil to contract, reducing the size and thus the reflection off the retina. The drawback is that your control of the exact moment of firing is restricted. When you press the shutter button, there is a delay while the pre-flash fires. This can be frustrating, especially if the pre-flash causes a reaction in the subject.
Shadows and Flattening
The other technical aspect of flash is that on-camera, flash is frontal which causes several less than flattering effects. The first is shadow. While heavy flash eliminates shadows in the subject, it creates shadows of the subject on the background. You can readily see this in the image of the moth above. The shadows of the antennae are clearly visible on the wings of the moth. In the moth photo below, the shadow of the left wing and the right antennae can be seen on the flower. If there is enough separation between the subject and the background, this problem disappears, but often, that takes a lot of distance.
The other common complaint about flash is the garish flattening of the subject that occurs when flash evens out the shadows and removes the modeling and the 3D feel of the subject. This can be partially addressed by reducing the output of the flash unit by about one f-stop.
Fortunately, both of these issues can be resolved by using an accessory flash and moving the flash high and a little to one side. The elevation will cast shadows downward and moving the flash to the side will improve modeling, creating slightly darker areas further from the light. The use of a reflector on the far side will help to even things out, but more on that in a later issue.
There is a lot that can be done in computer these days. Fill light settings can work wonders and you can add in a catchlight if you need one. It makes sense though to reduce the time at the computer by using all the techniques and equipment available in the field and that is where using a bit of flash can make or break an image. Learn how to use just the right amount of flash and your nature images will, if you will forgive the pun, take on a whole new light. Flash: it’s not just for nighttime or indoors anymore!